iOS
iOS automation is macOS-only. Astur uses Apple’s own tooling instead of an Appium server:
simctlfor simulator lifecycledevicectlfor real-device lifecyclexcodebuildto start the bundled Swift XCUITest runner- the Astur XCUITest agent for native lookup, waits, gestures, screenshots, and keyboard control
Astur bootstraps the bundled agent automatically. Users should not build or install the agent manually for normal local runs, but real iOS devices still require an Apple signing team because XCTest runners must be signed. For USB-connected real devices, Astur prefers the Xcode/CoreDevice tunnel for the host bridge before falling back to a LAN address.
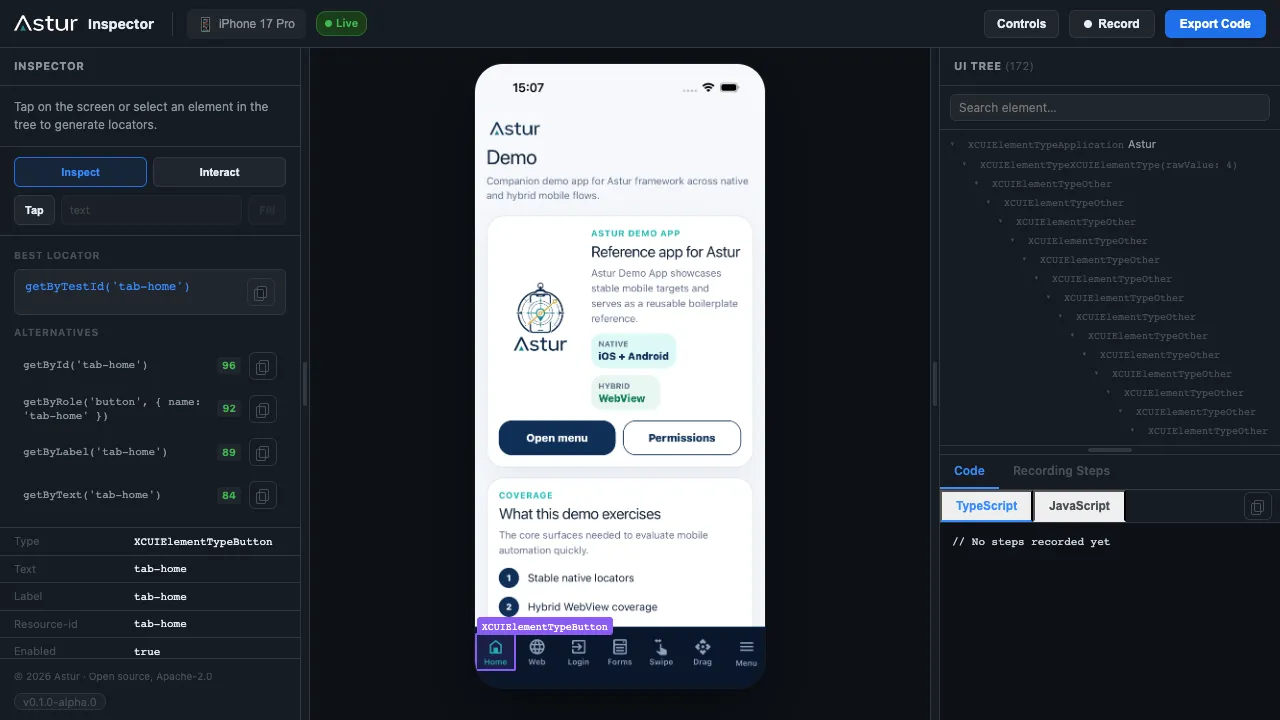
When everything is wired up, codegen streams a live device mirror, the full UI tree, and ready-to-paste locators:
Preconditions At A Glance
Section titled “Preconditions At A Glance”| What you need | iOS Simulator | Real iPhone / iPad |
|---|---|---|
| macOS + Xcode (opened once, license accepted) | Required | Required |
Command line tools: xcrun, simctl, xcodebuild | Required | Required |
| iOS simulator runtime (Xcode → Settings → Platforms) | Required | — |
devicectl (ships with Xcode) | — | Required |
| App artifact | Simulator-built .app | Device-signed .ipa |
Apple signing team (ASTUR_IOS_DEVELOPMENT_TEAM) | Not needed | Required |
| Device trusted by the Mac + Developer Mode on | — | Required |
| XCUITest agent | Auto-built & started | Auto-built, auto-signed & started |
You never install or provision the agent by hand. Astur builds and launches the bundled Swift XCUITest runner through Xcode on every session, and reuses a cached build (
DerivedData) on later runs. On real devices it also signs that runner with your Apple team — the one extra step simulators skip. The artifact rule is the thing to remember: simulator =.app, real device =.ipa.
Host Setup
Section titled “Host Setup”Install Xcode, open it once, accept licenses, and install any requested components.
sudo xcode-select -s /Applications/Xcode.app/Contents/Developerxcodebuild -versionnpx astur-mobile doctorChoose A Path
Section titled “Choose A Path”Pick the smallest iOS setup that matches what you want to do:
| Goal | Build your app first? | Artifact | Apple signing? | Command |
|---|---|---|---|---|
| Try Astur on a simulator with the demo app | No (download the demo .app) | Astur.app | No | npx astur-mobile codegen --ios --simulator --app ./Astur.app --app-id com.astur.demo |
| Inspect/test your own app on a simulator | Yes | Simulator-built .app | No | npx astur-mobile codegen --ios --simulator --app ./MyApp.app --app-id com.example.myapp |
| Inspect/test on a real iPhone or iPad | Yes | Device-signed .ipa | Yes | npx astur-mobile codegen --ios --real --device <device-udid> --app ./MyApp.ipa --app-id com.example.myapp |
Want a ready-to-run app to try first? The Astur demo app (
Astur.appfor simulators,astur.demo.ios.ipafor real devices, bundle idcom.astur.demo) ships in the Astur examples repository. Download it and point--appat it, or substitute your own build below.
Simulator Setup
Section titled “Simulator Setup”No Apple signing, no certificates — this is the fastest way to get onboarded.
Step 1 — Install a simulator runtime (once): Xcode → Settings → Platforms → add an iOS runtime.
Step 2 — Verify the toolchain sees a simulator:
xcrun simctl list devices availablenpx astur-mobile devices --iosStep 3 — Launch Inspector/codegen. Point --app at a simulator .app and pass its bundle id. To try Astur immediately, use the downloaded demo app; otherwise use your own build:
# Demo app (download Astur.app from the examples repo)npx astur-mobile codegen --ios --simulator --app ./Astur.app --app-id com.astur.demo
# Your own appnpx astur-mobile codegen --ios --simulator --app ./MyApp.app --app-id com.example.myapp
A browser tab opens automatically. Within a few seconds you should see the live device mirror and a populated UI tree (see the screenshot above). The first run is slower because Xcode builds the agent once; later runs reuse the cached build.
Use Your Own App On A Simulator
Section titled “Use Your Own App On A Simulator”To inspect or test your own app on a simulator, you need to build the app first. Astur expects a simulator-built .app from Xcode and does not compile the app for you. A typical Xcode output path is inside DerivedData, such as .../Build/Products/Debug-iphonesimulator/MyApp.app.
For test runs, add Astur to your Playwright config and run npx astur-mobile test:
import { defineConfig } from '@astur-mobile/test';
export default defineConfig({ testDir: './tests', use: { astur: { platform: 'ios', device: { kind: 'simulator', name: 'iPhone 16' }, app: { path: './build/MyApp.app', bundleId: 'com.example.myapp' } } }});npx astur-mobile test # all testsnpx astur-mobile test tests/login.test.tsReal Device Setup
Section titled “Real Device Setup”Real devices are the opposite tradeoff: Apple signing is required. Two things get signed, and Astur handles them differently:
- Your app — you ship a device-signed
.ipa. Astur does not sign your app for you. - The XCUITest agent — Astur builds and signs it for you at session start, but Apple requires a development team to do so. You provide that team; Astur does the rest (no manual provisioning profile juggling).
This signing setup does not exist on simulators.
Step 1 — Prepare the device:
- Connect the iPhone/iPad by USB.
- Tap Trust on the device when prompted.
- Enable Developer Mode (Settings → Privacy & Security → Developer Mode) and reboot.
- Add your Apple Developer account in Xcode → Settings → Accounts.
Step 2 — Provide the signing team. This is the single required variable for real devices:
export ASTUR_IOS_DEVELOPMENT_TEAM=ABCDE12345 # your 10-char Apple Team IDFind your Team ID in Xcode → Settings → Accounts → your team, or at developer.apple.com → Membership. When running from the source repo, Astur can also infer it from
agents/ios-xctest-agent/AsturIOSAgent.xcodeprojif that project is already signed in Xcode — but for npm installs and CI, always setASTUR_IOS_DEVELOPMENT_TEAMexplicitly. Astur signs the agent with automatic provisioning (-allowProvisioningUpdates); setASTUR_IOS_CODE_SIGN_IDENTITYonly if your environment needs a specific identity.
Step 3 — Make sure your .ipa is signed for this device. The app’s provisioning profile must include this device’s UDID. If it does not, install/launch fails with IOS_APP_INSTALL_SIGNATURE_INVALID.
Step 4 — Host bridge (usually automatic). Astur advertises the Xcode/CoreDevice USB tunnel to the on-device agent automatically. Only set a Mac LAN IP if the phone cannot reach the auto-detected bridge:
export ASTUR_IOS_AGENT_HOST=192.168.0.14The first real-device run can take several minutes while Xcode builds and signs the agent. Subsequent runs reuse the cached build and start in seconds.
Verify the device:
xcrun devicectl list devicesnpx astur-mobile devices --iosdoctor should report the connected real device, a configured signing team, and the bundled XCUITest agent project:
npx astur-mobile doctor --verboseReal-device config:
import { defineConfig } from '@astur-mobile/test';
export default defineConfig({  testDir: './tests',  use: {    astur: {      platform: 'ios',      device: {        kind: 'real',        id: '00008030-000548220EF0802E'      },      app: {        path: './build/MyApp.ipa',        bundleId: 'com.example.myapp'      }    }  }});
Then run the suite with the published CLI:
export ASTUR_IOS_DEVELOPMENT_TEAM=ABCDE12345npx astur-mobile testbundleId can be inferred from a local .app or .ipa when the app contains a readable Info.plist, but setting it explicitly is still recommended for CI. Make sure the .ipa is signed for the connected device — otherwise install fails with IOS_APP_INSTALL_SIGNATURE_INVALID.
Defaults
Section titled “Defaults”Astur uses OS-aware defaults for iOS:
automation: { engine: 'agent', legacyFallback: 'never', startupTimeoutMs: 60_000, commandTimeoutMs: 15_000},agent: { mode: 'required', install: true}You normally omit these. Override them only when debugging a custom agent endpoint or a slow CI host.
Keyboard And Fill
Section titled “Keyboard And Fill”iOS text fill defaults to paste-backed input through the XCUITest agent. This avoids XCTest typeText autocorrection issues, including extra characters or spaces after long strings.
await device.getByTestId('forms-main-input').fill('Astur native form automation');await device.keyboard.hide();await device.keyboard.show(device.getByTestId('forms-main-input'));When you need key-by-key input, opt in explicitly:
await device.getByLabel('Name').fill('Amr', { textInputMode: 'type' });Global keyboard behavior can be configured:
use: { astur: { platform: 'ios', keyboard: { dismiss: 'auto' } }}Performance And Stability
Section titled “Performance And Stability”iOS native automation runs through XCTest. Each tap, fill, swipe, and drag waits for the app to become idle (no in-flight UIKit/CoreAnimation work) before and after the event. This is what keeps XCTest reliable, but it also means anything that keeps the app animating makes individual actions slow or appear to hang until the command timeout. Two device settings remove the most common sources of this overhead. Apply them once on the simulator or real device you test on.
Disable Password AutoFill. When you focus a secure or login-styled field, iOS shows the Strong Password / AutoFill prompt over the keyboard. It animates in and out repeatedly, which keeps the app non-idle and makes fill on those fields slow even though the value is eventually typed. Turn it off for test devices:
Settings > Passwords > Password Options > AutoFill Passwords -> offEnable Reduce Motion. Shorter UIKit animations let XCTest reach the idle state faster, which speeds up gestures and prevents long stalls during animated transitions such as drag-and-drop snap effects:
Settings > Accessibility > Motion > Reduce Motion -> onAdditional guidance:
- Expose stable accessibility identifiers for every control you interact with.
getByTestId/getByIdresolve in one query; broad text or role enumeration is inherently slower, especially on real devices. - Keep custom in-app animations short or non-looping on screens under test. A continuously animating view never lets XCTest reach idle, so the next action waits the full command timeout before failing.
- For long strings, the default paste-backed fill is faster than key-by-key input. Only use
{ textInputMode: 'type' }when an input rejects paste.
Inspector On iOS
Section titled “Inspector On iOS”codegen launches the Astur Inspector — a live device mirror, the XCUITest UI tree, point-and-click locator generation, and step recording that exports a ready-to-run test (shown at the top of this page). See Inspector And Codegen for the full panel-by-panel walkthrough.
Start codegen with an app path and bundle id that match your target:
# Simulator (.app, no signing)npx astur-mobile codegen --ios --simulator --app ./MyApp.app --app-id com.example.myapp
# Real device (.ipa, needs ASTUR_IOS_DEVELOPMENT_TEAM)npx astur-mobile codegen --ios --real --device <device-udid> --app ./MyApp.ipa --app-id com.example.myapp
To target a specific simulator/device instead of the first match, add --device <device-udid> (find UDIDs with npx astur-mobile devices --ios).
Verify It Works
Section titled “Verify It Works”The session is healthy when, in the browser tab that opens:
- The status badge turns Live (top-left, green).
- The centre panel shows a live mirror of the device screen.
- The right UI TREE panel fills with elements.
- Clicking an element (or a node in the tree) generates locator suggestions on the left.
If the badge stays on Connecting… or the mirror never appears, see Troubleshooting → Inspector never becomes ready.
If App Or Agent Is Missing
Section titled “If App Or Agent Is Missing”Use this rule of thumb for command choice:
- First run or app not installed yet: include
--appso Astur can install before attaching. - App already installed:
--app-idis enough. - If app is missing and you pass only
--app-id, Astur returnsIOS_APP_NOT_INSTALLED.
Example commands:
# Simulator, install + attach in one command.npx astur-mobile codegen --ios --simulator --app ./MyApp.app --app-id com.example.myapp
# Real device, install + attach in one command.ASTUR_IOS_DEVELOPMENT_TEAM=ABCDE12345 \npx astur-mobile codegen --ios --real --device <device-udid> --app ./MyApp.ipa --app-id com.example.myapp
# Already-installed app, path omitted.npx astur-mobile codegen --ios --simulator --app-id com.example.myapp
Astur iOS agent behavior:
- No manual agent install step is required on simulator or real device.
- Astur starts the bundled Swift XCUITest runner automatically for each session.
- On both simulator and real device, the mirror, UI tree, screenshots, and native interactions are all served by the XCUITest agent once it is started and bound to the target bundle id.
- Simulator failures are usually Xcode/runtime boot issues.
- Real-device failures usually require signing setup (
ASTUR_IOS_DEVELOPMENT_TEAM, trusted device, unlocked keychain).
For failure-specific fixes, see Troubleshooting.
Automatic Session Cleanup
Section titled “Automatic Session Cleanup”Astur owns the lifecycle of the XCUITest agent so it never leaves a session holding your device:
- Each agent runs in its own process group, so a normal exit or
Ctrl-Ctears down bothxcodebuildand the test runner it spawns. - Before starting a new session, Astur reaps any leftover agent process for the same project + device (for example, after a previous run was force-killed). Disable this with
ASTUR_IOS_AGENT_REAP=0if you manage an external, shared agent yourself.
Debugging The Agent
Section titled “Debugging The Agent”# Log every command the host queues, delivers, and gets a response for.ASTUR_IOS_AGENT_TRACE=1 npx astur-mobile codegen --ios --simulator --app ./MyApp.app --app-id com.example.myappSee Configuration → iOS environment variables for the full list (agent project/scheme overrides, ports, derived-data path, signing identity, and tool paths).
Real-Device Transport
Section titled “Real-Device Transport”Astur real-device execution has two connections:
| Connection | Owned by | Notes |
|---|---|---|
| App lifecycle | devicectl + XCUITest agent | devicectl installs, uninstalls, and lists devices. Once the agent is attached, app launch/terminate is routed through XCUITest so the runner and app stay bound to the same session. |
| Native automation | Astur XCUITest agent | Reads the UI tree, performs taps/fills/swipes, handles orientation, and captures screenshots. |
| Host bridge | Astur runtime | Uses the CoreDevice USB tunnel when available; falls back to ASTUR_IOS_AGENT_HOST or a reachable Mac address. |
If the XCUITest output contains Local network prohibited, keep the device connected by USB and remove any forced ASTUR_IOS_AGENT_HOST value so Astur can use the CoreDevice tunnel. Only force ASTUR_IOS_AGENT_HOST for environments where the phone can reach the Mac over the network and the local network permission is allowed.
Supported Operations
Section titled “Supported Operations”| API | Simulator | Real device | Notes |
|---|---|---|---|
device.app.install() | Yes | Yes | Use a simulator-built .app on simulators. Use a device-signed .ipa on real devices. Astur unwraps IPA contents internally before install. |
device.app.launch() | Yes | Yes | Launches the configured bundle id. |
device.app.terminate() | Yes | Yes | Real devices terminate by matching the launched app process. |
device.app.reset({ reinstall: true, launch: true }) | Yes | Yes | Uninstall/reinstall reset. |
device.app.uninstall() | Yes | Yes | Removes the configured bundle id. |
device.permissions.grant('camera') | Yes | No | Uses simctl privacy; Apple does not expose equivalent real-device control. |
device.permissions.revoke('camera') | Yes | No | Same limitation as grant. |
device.setOrientation('landscape') | Yes | Yes | Routed through the XCUITest agent for native UI sessions. |
device.orientation.portrait() | Yes | Yes | Convenience wrapper. |
device.lock() / device.unlock() | Yes | No | Simulators support screen power control; real devices must be managed manually. |
device.screenshot() | Yes | Yes | Real devices capture through the XCUITest agent. |
| Video recording | Yes | No | Simulator-only for now. If enabled on a real device, Astur skips the native video attachment instead of failing the test. |
| Native locators and gestures | Yes | Yes | Requires the XCUITest agent. |
locator.scrollIntoView() | Yes | Yes | Cross-platform. Swipes within the viewport (or a given container) until the element is visible. See the Android docs for options. |
For fastest real-device execution, expose stable accessibility identifiers for controls and dynamic values. XCTest can tap and fill by id quickly, but broad text enumeration such as “find every visible number on the screen” is inherently slower on real devices.
Known Apple Limits
Section titled “Known Apple Limits”- Real iOS apps and XCTest runners must be signed with your team.
- System alerts are automatable only when XCTest exposes them to the test runner.
- Direct per-app data/cache clearing is not public on iOS; use uninstall/reinstall reset.
- Real-device lock/unlock and permission mutation are not reliable through public local tooling.
The agent source lives in:
agents/ios-xctest-agent/It binds to the app bundle id, reads the accessibility tree, performs native actions, and bridges compact JSON results back to the Node.js runtime.